My husband said something the other day to a friend of ours, something along the lines of 'married a good looking girl almost 10 years younger than myself... she wants a hobby... and takes up crocheting'.
I've turned in to an old lady.
I have to admit, we find this really humorous. It was something my grandmother taught me as a child. My mom-in-law helped me revive the skill last year over our Thanksgiving visit and here I am a year later, picking the hook back up and crocheting my head off.
I've decided to venture in to the possibility of a mini side business and a coworker jumped on board. we've been crocheting like crazy getting ready for our first craft fair in December. Today we're headed off island to search for more inspiration.
Not that I need more inspiration. You should see how many skeins of yarn I managed to collect over the last month. Makes for a lot of adorable things I can't wait to share :)

Tuesday, November 2, 2010
Friday, October 29, 2010
I've accomplished something!
I accomplished two things yesterday that are kind of a big deal to me.
1. I finished the intended housewarming gift for my blog friend, Ashley.
It took me forever. I have no concept of time. I exchanged addresses with her two months ago. Fear not my dearest Ashley, your gift is on it's way TODAY! I hope you like it. Lots of time (ha!) and thought went in to it.
2. I WORKED OUT.
I did. I'm serious. I worked out for the first time in... Oh, I can't even count how many months. Two motivating factors. My husband started working out again last week and I found all of the cupcakes and gummy bears I've been hoovering down over the last couple of months planted firmly around my middle and reflecting a larger number on the scale. Bummer. I started Insanity which is strongly suggested by my husband. It was HARD.
All in all, good week for me! Happy Friday everyone!
Monday, October 25, 2010
Doing it the right way: The kitchen cabinet edition.
Let me tell you a long drawn out story before I get to the heart of this post. I know, you're just thrilled.
I moved in to my beloved home in January of 2008. The love of my life asked if I would like to live with him, it helped us both financially, and I was much closer to work. I gave it thought over a couple of months and in the month of January moved in my things from my apartment 30 minutes away and was officially a resident.
My dearest boyfriend at the time had owned our house for 9 years. In those 9 years he'd done nothing to the place to change the atmosphere. There was nothing wrong with the house, it was just outdated. He was more than up for a change and I helped him make that happen.
The cabinets were painted the very faintest green, with a sage trim. Sure, maybe great for when I was 12, but not so much now. I repainted them antique white with black trim. Suited my taste at the time (and I was hardly that handy when it came to design). Just over 6 months later after I had gotten my debt paid off, we were living debt free (house and cars excluded) and ready to invest in remodeling the house. This is where my first blog I ever followed came in. She painted her kitchen cabinets black. I LOVED black. So I went for it. Painted them black, and threw the doors back on with stainless hardware.
Great for the first bit, not great six months later. I've sat on them until now. I hated the paint job, the finish, the color. Everything. They literally sucked.
WOW. I told you it would be long winded. Last month I realized I have ten thousand and one projects started but none of them completed. I had to choose something I could do on my own (almost) start to finish. Kitchen cabinets it was.
I was blog surfing and came across a link that led me to Sunset for a tutuorial on making window valances of some sort. I poked around on the site and came across How to give your cabinets a makeover. SOLD!
If you want to repaint your cabinets, read this and soak it up. When they say your kitchen will NOT be of use to your daily life, they're serious. No cooking. I lived off cupcakes and coffee for three days. It was bliss. They say to set aside 4 days. This literally took me 4 days. No joke.
So here's what I did:
1. Empty every cupboard and drawer. Make a huge mess of the rest of your house by placing the contents throughout every available room. When I ate cereal, I fetched the bowl from the dining room table and the silverware from the couch. Empty it, seriously. The first time we "did it right", we didn't empty them. Then I had to wash every.damn.dish. They were covered in dust and paint flecks.
2. Sanded any and all imperfections I could find. There were drips from the previous 3 paint jobs. Sand away baby. Keep the vacuum handy. It's so much easier to vacuum up in stages rather than going back to after it all.
3. Clean the cabinets with TSP Solution. It comes in a spray bottle for $5. I found it in the paint section at Home Depot. It was down the same aisle as the wood glue and other random crap, like GIANT buckets of Zinsser Primer and so on. This takes all grime off the cabinets and also helps dull any sort of glossy finish. It helps avoid all over sanding and ensures your cabinets are perfectly clean for primer and paint. This stuff stinks. I'd reccommed wearing a mask when spraying it, keeping the room well ventalated and pets away. It makes you cough like no other. Wear gloves. It makes your hands dry and itchy. It's a no-wash solution, so there is no need to soap down the cabinets afterward.

5. Start painting! Use good quality paint in a semi gloss finish. I used my good old Ralph Lauren in Sisal. Home Depot doesn't carry Ralph Lauren paint any longer (booooo!), but still have their color codes in the computer and can mix them with Martha Stewart (recommended by me) or Behr (not recommended by me for interior). I started painting the evening of Day 2. I finished half of the outside of the cabinets and called it a day after 13 hours of work. Day 3 was a long one. I had to paint the inside and outside of all the cabinets, including cutting in all of the edges. This was the biggest pain in the ass. I painted the inside of all of the cabinets because they desperately needed it. I did two coats on the upper cabinets as some of them will be left as open concept shelving. Two coats on the inside certainly isn't required if you're only looking to "clean them up". Day 4 was my third 13-14 hour day. My body was sore like I'd just run 8 miles up hill. Man, what a workout. I put the second coat on the everything that needed it, and a third in places along the trim I felt looked a little funny. It's so important to give your paint 24 hours dry time between coats! This allows adequate drying and avoids any sort of soft layers, prevents dust from collecting and keeps any finger prints away that may want to leave their mark.
6. Put everything back! I gave two days dry time before I put all of my stuff away. I was able to do this because Husband was out of town for the week training. Otherwise I would have felt a little more rushed. He's not one to like sitting in chaos and clutter. I however don't mind that much when I know I'm in the middle of something.
Steps I haven't covered are the doors and drawers. I don't have either of those done yet. The link provided up top will give you instructions on those. Follow them to the letter friends! I promis it will be worth it. We have 6 drawers total that need painting, and we plan to build new doors for the cabinets to give them a face lift. They would have been done at this point, but with the basement flooding, it put a that plan on hold.
If you're still here, thank for sticking through this hugely word heavy post! This was a great experience, even with the long hours I put it. I absolutely love how my cabinets turned out and I get to admire my dedication and handy work every day.
To my blog friend, Mrs. D over at The Pink Lemonade Blog; I'm so sorry your recent cabinet update is failing you. I sure hope this helps! If I could fly to Virginia to help you with the project again, I would! But know your cabinets are the post that helped me find my way over to your little corner of the world and I still think they're fabulous.
I moved in to my beloved home in January of 2008. The love of my life asked if I would like to live with him, it helped us both financially, and I was much closer to work. I gave it thought over a couple of months and in the month of January moved in my things from my apartment 30 minutes away and was officially a resident.
My dearest boyfriend at the time had owned our house for 9 years. In those 9 years he'd done nothing to the place to change the atmosphere. There was nothing wrong with the house, it was just outdated. He was more than up for a change and I helped him make that happen.
The cabinets were painted the very faintest green, with a sage trim. Sure, maybe great for when I was 12, but not so much now. I repainted them antique white with black trim. Suited my taste at the time (and I was hardly that handy when it came to design). Just over 6 months later after I had gotten my debt paid off, we were living debt free (house and cars excluded) and ready to invest in remodeling the house. This is where my first blog I ever followed came in. She painted her kitchen cabinets black. I LOVED black. So I went for it. Painted them black, and threw the doors back on with stainless hardware.
Great for the first bit, not great six months later. I've sat on them until now. I hated the paint job, the finish, the color. Everything. They literally sucked.
WOW. I told you it would be long winded. Last month I realized I have ten thousand and one projects started but none of them completed. I had to choose something I could do on my own (almost) start to finish. Kitchen cabinets it was.
I was blog surfing and came across a link that led me to Sunset for a tutuorial on making window valances of some sort. I poked around on the site and came across How to give your cabinets a makeover. SOLD!
If you want to repaint your cabinets, read this and soak it up. When they say your kitchen will NOT be of use to your daily life, they're serious. No cooking. I lived off cupcakes and coffee for three days. It was bliss. They say to set aside 4 days. This literally took me 4 days. No joke.
So here's what I did:
1. Empty every cupboard and drawer. Make a huge mess of the rest of your house by placing the contents throughout every available room. When I ate cereal, I fetched the bowl from the dining room table and the silverware from the couch. Empty it, seriously. The first time we "did it right", we didn't empty them. Then I had to wash every.damn.dish. They were covered in dust and paint flecks.
2. Sanded any and all imperfections I could find. There were drips from the previous 3 paint jobs. Sand away baby. Keep the vacuum handy. It's so much easier to vacuum up in stages rather than going back to after it all.
3. Clean the cabinets with TSP Solution. It comes in a spray bottle for $5. I found it in the paint section at Home Depot. It was down the same aisle as the wood glue and other random crap, like GIANT buckets of Zinsser Primer and so on. This takes all grime off the cabinets and also helps dull any sort of glossy finish. It helps avoid all over sanding and ensures your cabinets are perfectly clean for primer and paint. This stuff stinks. I'd reccommed wearing a mask when spraying it, keeping the room well ventalated and pets away. It makes you cough like no other. Wear gloves. It makes your hands dry and itchy. It's a no-wash solution, so there is no need to soap down the cabinets afterward.

4. Prime your cabinets. Be sure to use a good quality primer. If you have stains, be sure to get something that blocks stains. They will bleed through everything. Primer and paint. I chose not to get the stain blocking primer and have one spot that continues to bleed through. Thankfully it's inside a low cabinet and my baking sheets sit of top of it. I used a Zinsser Primer that cost about $18 for the gallon. Zinsser is the favorite primer of Shannon at The House Creative. She does great work and speaks highly of the brand, so I went with it. Day 1 I primed all of the cabinets. Inside and out and allowed to dry over night. Day 2, I primed in the morning a second coat. The better coat of primer you have, the less paint you have to use, meaning less expensive project.
5. Start painting! Use good quality paint in a semi gloss finish. I used my good old Ralph Lauren in Sisal. Home Depot doesn't carry Ralph Lauren paint any longer (booooo!), but still have their color codes in the computer and can mix them with Martha Stewart (recommended by me) or Behr (not recommended by me for interior). I started painting the evening of Day 2. I finished half of the outside of the cabinets and called it a day after 13 hours of work. Day 3 was a long one. I had to paint the inside and outside of all the cabinets, including cutting in all of the edges. This was the biggest pain in the ass. I painted the inside of all of the cabinets because they desperately needed it. I did two coats on the upper cabinets as some of them will be left as open concept shelving. Two coats on the inside certainly isn't required if you're only looking to "clean them up". Day 4 was my third 13-14 hour day. My body was sore like I'd just run 8 miles up hill. Man, what a workout. I put the second coat on the everything that needed it, and a third in places along the trim I felt looked a little funny. It's so important to give your paint 24 hours dry time between coats! This allows adequate drying and avoids any sort of soft layers, prevents dust from collecting and keeps any finger prints away that may want to leave their mark.
6. Put everything back! I gave two days dry time before I put all of my stuff away. I was able to do this because Husband was out of town for the week training. Otherwise I would have felt a little more rushed. He's not one to like sitting in chaos and clutter. I however don't mind that much when I know I'm in the middle of something.
Steps I haven't covered are the doors and drawers. I don't have either of those done yet. The link provided up top will give you instructions on those. Follow them to the letter friends! I promis it will be worth it. We have 6 drawers total that need painting, and we plan to build new doors for the cabinets to give them a face lift. They would have been done at this point, but with the basement flooding, it put a that plan on hold.
If you're still here, thank for sticking through this hugely word heavy post! This was a great experience, even with the long hours I put it. I absolutely love how my cabinets turned out and I get to admire my dedication and handy work every day.
To my blog friend, Mrs. D over at The Pink Lemonade Blog; I'm so sorry your recent cabinet update is failing you. I sure hope this helps! If I could fly to Virginia to help you with the project again, I would! But know your cabinets are the post that helped me find my way over to your little corner of the world and I still think they're fabulous.
Sunday, October 24, 2010
Starting my wish list early.
This is the second time since 2006 that I will have Christmas off, since starting my job at the dispatch center. I worked '06, '08, and '09 (thinking back to 2006 seems like an eternity). I'm super excited!
We will get to take part in our morning childhood ritual at my parents house of letting Mom wake us up early, because she doesn't know what sleeping in is. We'll open our stockings while Mom makes coffee and Dad gets the camera ready. Dad will pop the cinnamon rolls in the oven and we'll dive in to our presents. When we're done, we'll enjoy coffee, cinnamon rolls and usually omelettes. This year I'm sure there will be football, naps and then an afternoon dinner.
Can you tell I'm totally looking forward to this?
The family has serious problems with gift giving. We often tend to go overboard. Collecting over the couple months before Christmas, not remember you've already gotten a little something, then have far too much to wrap. Makes you feel like a kid again, but not always a friend to the pocket book. This year we've decided on a price limit of about $25. Mom wasn't sure this would work, but listen, I've already found some really good ideas! Let's take a look, shall we?
Spring Mix Apron - $32
(yes I know, more than the limit, but not by much!)
Tea & Toast Butter Dish - $12
Wingspan Bottle Opener - $16
Castle Key Bottle Opener - $12
Seasonal Specialties Oven Mitt & Pot Holder - $12 (each)
Juxtapose Dishtowels - $24
Tapestry Dishtowels - $24
{all gift ideas found via Anthropologie}
We're all so hard to shop for, it's nice to have a good list of inexpensive ideas.
So dear family members who read my blog, get to making your wish list! I've got some shopping to do!
Saturday, October 23, 2010
a bouncing baby boy!
I don't think I've mentioned on here before that my husband and I will be an uncle and aunt for the very first time ever in January. Husband's older brother and his wife are expecting their first child together, a bouncing baby boy, and we couldn't be more thrilled!
This will be the first grandchild for either side of our families. I should mention that we do in fact have a nephew in the family and he's one of the coolest kids you'll ever meet. Q (we really do call him this) is my sister-in-law's son. I'm sure to him we're just us, not really an aunt and uncle, but if he wanted to call us his aunt and uncle, we'd sure take it! No matter how he looks at us, we still love him to death. I mean, he taught me how to play Guitar Hero. And then on the way home from their house, we stopped by the closest Walmart to pick it up for ourselves! That's how cool of a kid he is.
We're excited about the newest addition to the family, and I hope Q is excited to be a big brother! Today is my sister-in-law's baby shower in Portland, and this is in fact where I am at this very moment. My mom and I left yesterday for the 5 hour drive two spend two nights away in Oregon. I couldn't share my gifts for her and the baby until now, because I know she reads my blog, so I waited until today.

The first two sleepers I just absolutely adore. The owls and the stripes just kill me. I'd really just like to keep them for myself so I can stare at their miniature cuteness when I need a pick-me-up. Impractical? Probably. So I'll give them to baby S.


The second two outfits I bought in a larger size. We found out he was a boy during the summer, so I did the math on my fingers and bought these in the size he'd be during the summer of 2011. Can't wait to see little chubby legs sticking out of his jean shorts!

I think onesies are one of the best inventions in the world. I also happen to love stripes. So I picked up all the boy onesies I could find locally in a striped fashion. Love them!


And last but not least is this darling, silky little thing. This is a blanket made with love by Auntie Cassie for baby S. Yes, you heard that right. I made this! I was absolutely thrilled with how it came out. It's really beatiful yarn and so plush and soft.

I really hope my sister-in-law loves it.

I hope my mom-in-law loves it to! I told her I had made a blanket for the baby, and I know she's been waiting to see the finished product.
I'll post pictures of the shower later this week if sis-in-law is ok with me sharing :) Hope everyone is having a great weekend!
Friday, October 22, 2010
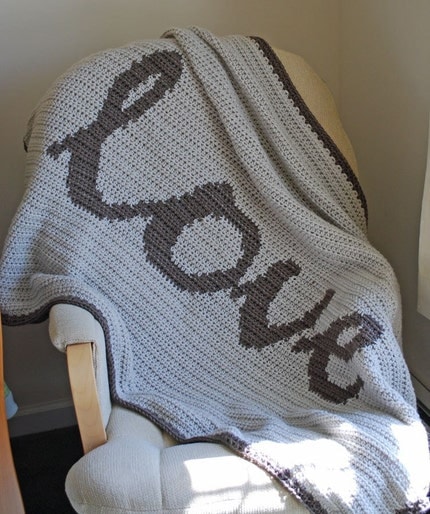
love.
I've been crocheting in my spare time. While watching tv, in my down time at work, while I'm winding down before bed. It's been enjoyable and I'm making great progress.
A friend and I will be creating as much stuff as we can over the next month for a craft fair in town. I've been creating baby blankets and she's been creating the cutest scarves. Hopefully we have enough finished for a reasonable sized booth!
While searching Etsy for some insight on how granny squares are joined together, while still looking good, I've come across a ton of inspiration.

Can I just say, WOW! This is absolutely stunning. I wish I was talented enough to create something this detailed. I hope my talent continues to develop and one day I may just try my hand at something like this!
Visit Hookaholic's Etsy Shop for more beautiful blankets and baby goodies! You'll be inspired.
Follow my blog with bloglovin
A friend and I will be creating as much stuff as we can over the next month for a craft fair in town. I've been creating baby blankets and she's been creating the cutest scarves. Hopefully we have enough finished for a reasonable sized booth!
While searching Etsy for some insight on how granny squares are joined together, while still looking good, I've come across a ton of inspiration.
Visit Hookaholic's Etsy Shop for more beautiful blankets and baby goodies! You'll be inspired.
Follow my blog with bloglovin
Thursday, October 21, 2010
34. One Bowl Brownies
My neighbor started on brownies. She had been making cupcakes like crazy until she found out I was banned from them. No sugary treats were allowed to be delivered from her house for two weeks. Her husband has a good memory. I swear exactly two weeks later, he arrived at the door with brownies she had mad.
They tasted like a chocolate cream brownie, but not quite as dense and moist as we like. We've discussed making brownies for the last week, but I just haven't bothered. I've really done nothing more than crochet, cook a few soups and watch endless amounts of Dexter via Netflix.
I was hungry. Well, I'm always hungry. So I immediately got on to Tasty Kitchen and looked for an enticing brown recipe. I found exactly what I was looking for and promptly made it.

Add eggs, sugar, oil, flour, cocoa, salt, vanilla and baking powder. Mix until just combined.

Scrape the edges of the bowl and give it a brief mix again.

Pour in to a greased 9x9 baking pan, or in my case a muffin pan. I threw out my 9x9, so this was the best I could do. I also filled them a little too much and only ended up with 10. But then you have brownies almost the size of cupcakes, and we all know I love cupcakes!

In a separate bowl if you so please (I do), combine powdered sugar, chocolate chips and chopped nuts of your choice.

Top your batter and pop in to an oven heated to 350 degrees. If using a 9x9 pan, bake 30-35 minutes. If using a muffin pan, listen to your husband when he says they smell done. So perhaps cook 20-25 minutes. Check with a toothpick and they're done when the stick comes out clean. The less you cook them, the more moist they are. I've learned this. Sometimes I hate telling him he's right.

Pull them out of the oven and run a knife along the outside edge to loosen them up. I plopped one on a plate and drizzled it with the Starbucks Caramel Sauce my mom gave to me in my fall care package.

Cute and delicious!
One Bowl Brownies
adapted from Tasty Kitchen
2 eggs
1 cup sugar
1/2 cup vegetable oil
3/4 cup flour
4 tbsp cocoa
1/2 tsp salt
1 tsp vanilla
1/2 tsp baking powder
1/4 cup chocolate chips
1/4 cup nuts
1/4 cup powdered sugar
Combine the first 8 ingredients in a bowl. Mix until just combined. Scrape sides of the bowl and mix again briefly. Pour into greased 9x9 baking pan (or muffin pan).
Mix together last 3 ingredients and sprinkle on top of the brownie batter, covering evenly. Bake in the oven at 350 degrees for 30-35 minutes (20-25 for muffin pan). Test centers with a toothpick, done when it comes out clean.
Serve hot from the oven or after cooling. Either way, they're delish! Enjoy!
Subscribe to:
Posts (Atom)